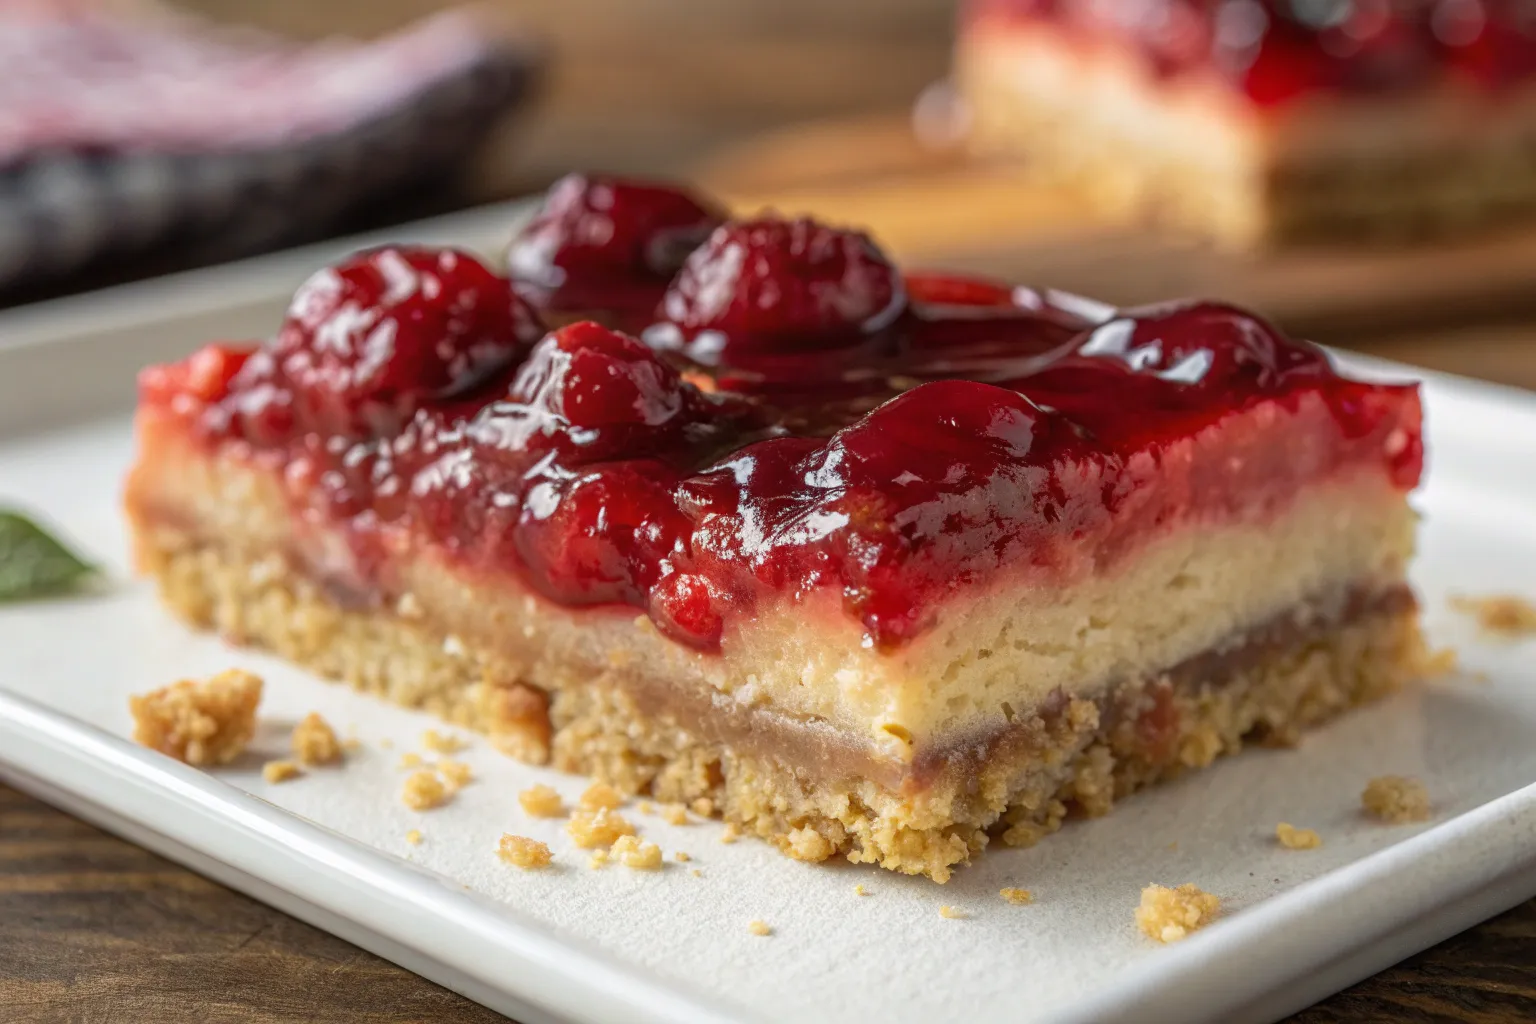
Christmas Cherry Bars – Classic

Christmas isn’t complete without festive treats, and Christmas Cherry Bars are a timeless favorite. Bursting with tart cherries, rich buttery crust, and a sweet topping, these bars are perfect for holiday gatherings, gift-giving, or cozy nights by the fire. Simple to make and irresistibly delicious, they’ll quickly become a holiday staple.
Why You’ll Love This Recipe
This recipe isn’t just another dessert, it’s a holiday classic. The combination of tart cherries, buttery crumb, and subtle vanilla notes creates a flavor that’s festive, comforting, and utterly irresistible. It’s easy to make, adaptable for different dietary needs, and perfect for gifting or entertaining. Simply put, once you try these bars, they’ll become a holiday favorite year after year.
- Festive flavor: The combination of sweet and tart cherries makes these bars uniquely Christmassy.
- Easy to make: With a simple crust and cherry filling, you can whip these up even during a busy holiday week.
- Versatile: Perfect for gifting, holiday parties, or enjoying with a warm cup of cocoa.
- Make-ahead friendly: Bake in advance and store or freeze for later enjoyment.
Nutritional Information (per bar, approximate)
While indulging in holiday treats is part of the fun, it’s helpful to know what goes into your favorite desserts. These bars provide a sweet treat with a reasonable balance of carbs, fats, and sugars, making it easy to enjoy them mindfully. Knowing the nutritional information also allows you to plan portions for gatherings or gift boxes without any guesswork.
- Calories: 210
- Fat: 10g
- Carbohydrates: 28g
- Sugar: 18g
- Protein: 2g
Note: Nutritional values may vary based on ingredients used.
Time Breakdown
Baking can sometimes feel overwhelming during the busy holiday season. By breaking down the time needed for prep, baking, and cooling, you can plan your holiday baking schedule with ease. This section will help you see that making Christmas Cherry Bars is a manageable and enjoyable process, even on a tight schedule.
- Prep time: 20 minutes
- Cook time: 35–40 minutes
- Cooling time: 15 minutes
- Total time: 1 hour 10 minutes
Ingredients You’ll Need
The magic of these cherry bars comes from a handful of simple ingredients. From pantry staples like flour, sugar, and butter to the star of the show, cherry preserves each component contributes to the perfect balance of texture and flavor. Gathering these ingredients ahead of time ensures a smooth and stress-free baking experience.
- 2 cups all-purpose flour
- 1/2 teaspoon baking powder
- 1/4 teaspoon salt
- 1 cup unsalted butter, softened
- 1 cup granulated sugar
- 2 large eggs
- 1 teaspoon vanilla extract
- 1 1/2 cups cherry preserves or canned cherries, drained
- Optional: powdered sugar for dusting
Condensed Grocery Checklist
Holidays are hectic, and last-minute trips to the store are the last thing anyone wants. This checklist provides a quick glance at everything you’ll need, making your shopping trip efficient and hassle-free. With all ingredients on hand, you can focus on the fun part, baking and enjoying these festive treats.
- All-purpose flour
- Baking powder
- Salt
- Unsalted butter
- Granulated sugar
- Eggs
- Vanilla extract
- Cherry preserves/canned cherries
- Powdered sugar (optional)
How to Make – Step by Step
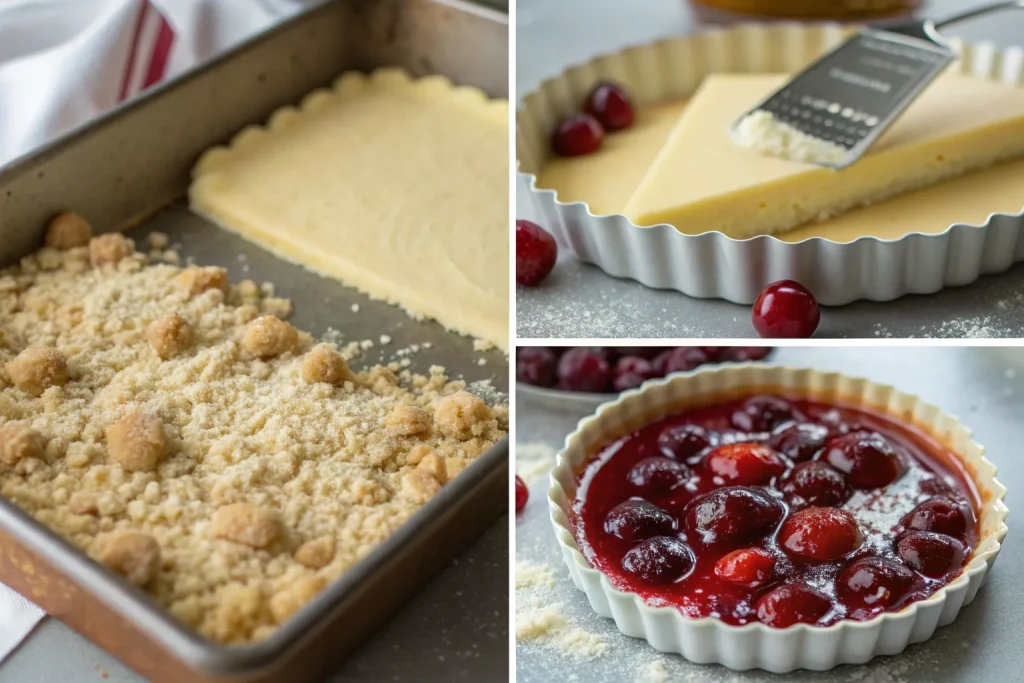
Baking can be intimidating, but this recipe breaks it down into simple, manageable steps. From preparing the crust to layering the cherries and adding the crumbly topping, each step is designed to ensure your bars turn out perfect every time. Follow along carefully, and you’ll have beautiful, mouthwatering bars ready in no time.
- Preheat oven to 350°F (175°C). Line a 9×13-inch pan with parchment paper.
- Prepare the crust: In a bowl, whisk together flour, baking powder, and salt.
- Cream butter and sugar: Beat butter and sugar until light and fluffy. Add eggs one at a time, then mix in vanilla extract.
- Combine dry and wet ingredients: Gradually fold the flour mixture into the butter mixture until crumbly.
- Press into pan: Reserve 1/2 cup of dough for topping. Press the rest evenly into the prepared pan.
- Add cherry layer: Spread cherry preserves evenly over the crust.
- Add topping: Crumble the reserved dough over the cherries.
- Bake: 35–40 minutes, until golden brown. Let cool completely.
- Optional: Dust with powdered sugar before slicing into squares.
Ingredient Swaps & Variations
Every baker has preferences or dietary needs, and this section gives you options to make the recipe your own. Whether you want to swap butter for a non-dairy option, use different fruits, or add nuts for extra crunch, these variations allow for creativity without compromising flavor.
- Butter substitute: Use coconut oil or margarine for a dairy-free option.
- Sugar alternatives: Brown sugar or coconut sugar works for a slightly richer flavor.
- Fruit variations: Swap cherries for raspberries, blueberries, or mixed berries.
- Nuts: Add chopped almonds or pecans for extra crunch.
Serving Suggestions

Presentation matters, especially during the holidays. This section offers ideas on how to serve your cherry bars to maximize enjoyment. Whether paired with beverages, whipped cream, or packaged as gifts, these suggestions will elevate your festive dessert experience.
- Pair with a warm cup of coffee, cocoa, or spiced tea.
- Serve alongside whipped cream or vanilla ice cream for a decadent dessert.
- Package in festive boxes for a holiday gift.
Storing Tips
Nothing is worse than stale or soggy holiday treats. Proper storage ensures your cherry bars stay fresh, chewy, and delicious for days or even weeks. Learn how to store them at room temperature, in the fridge, or frozen, so you can enjoy them anytime without sacrificing taste or texture.
- Room temperature: Store in an airtight container for up to 3 days.
- Refrigerator: Keep for up to 1 week.
- Freezing: Wrap tightly in plastic wrap and foil; freeze for up to 3 months. Thaw before serving.
Common Mistakes to Avoid
Even experienced bakers can run into small pitfalls that affect the texture or flavor of desserts. This section highlights the most common mistakes, like overbaking or using too much filling; and provides tips to avoid them, ensuring every batch of cherry bars is perfect.
- Overbaking: Bars should be golden, not dark brown, to stay soft and chewy.
- Uneven layers: Press the crust evenly to prevent a lopsided bar.
- Too much filling: Excess cherry preserves can make bars soggy.
Chef’s Special Tips
These are insider tips that elevate your baking from good to exceptional. From chilling the dough for easy crumbling to slicing with a hot knife for clean edges, these professional tricks guarantee bars that look as amazing as they taste.
- Chill the dough slightly before baking to make crumbling easier.
- Use fresh or high-quality cherry preserves for the best flavor.
- Slice bars with a sharp knife dipped in hot water for clean edges.
Conclusion
Baking is about joy, creativity, and sharing love through food. These Christmas Cherry Bars capture all of that in every bite. With a simple recipe, versatile ingredients, and plenty of tips for success, this dessert is a festive must-have for the holidays. Bake, share, and savor these bars, they’re destined to become a cherished holiday tradition.